Ultimate ARK Ragnarok: Master Every Base with the Definitive Location Guide
Ultimate ARK Ragnarok: Master Every Base with the Definitive Location Guide
In the sprawling beast of Ark: Survival Evolved, navigating the fiery zones of Ragnarok demands more than survival intuition—it requires strategic location mastery. The Ultimate ARK Ragnarok Base Locations Guide delivers exactly that, mapping every stealthy hideout, resource-rich stronghold, and tactical redoubt across Ragnarok’s hellish territorial map with precision. Whether你 are a seasoned worker collecting Berries or a base defender holding ground under relentless raids, understanding these key strongholds transforms your gameplay from reactive to strategic.
### The Strategic Importance of Base Placement in Ragnarok’s Ragnarok Era Ragnarok’s shifting continents and ever-expanding territories turn every location into a critical asset. Bases serve as more than shelters—they are production hubs, stockpiles, and command stations. The guide highlights how optimal placement minimizes exposure to predators, maximizes access to crafting materials, and ensures uninterrupted supply chains.
Among the most vital considerations is balancing accessibility with defensibility, a balance the Ultimate ARK Ragnarok Base Locations Guide pinpoints through detailed terrain analysis and utility breakdowns. 每个基地在地图上的位置直接决定了玩家的安全性和资源获取效率。极端暴露的地点,尽管方便侦察,往往成易成靶,处于敌方清剿范围内。相反,隐蔽性强但资源匮乏的基地则成为长期可持续运营的瓶颈。正如战术策略家 Max Galloway emphasizes: “In Ragnarok’s Ragnarok assaults, what separates the victors from the vanquished is often their base’s geographical advantage.”
1. Key Base Types and Their Optimal Locations
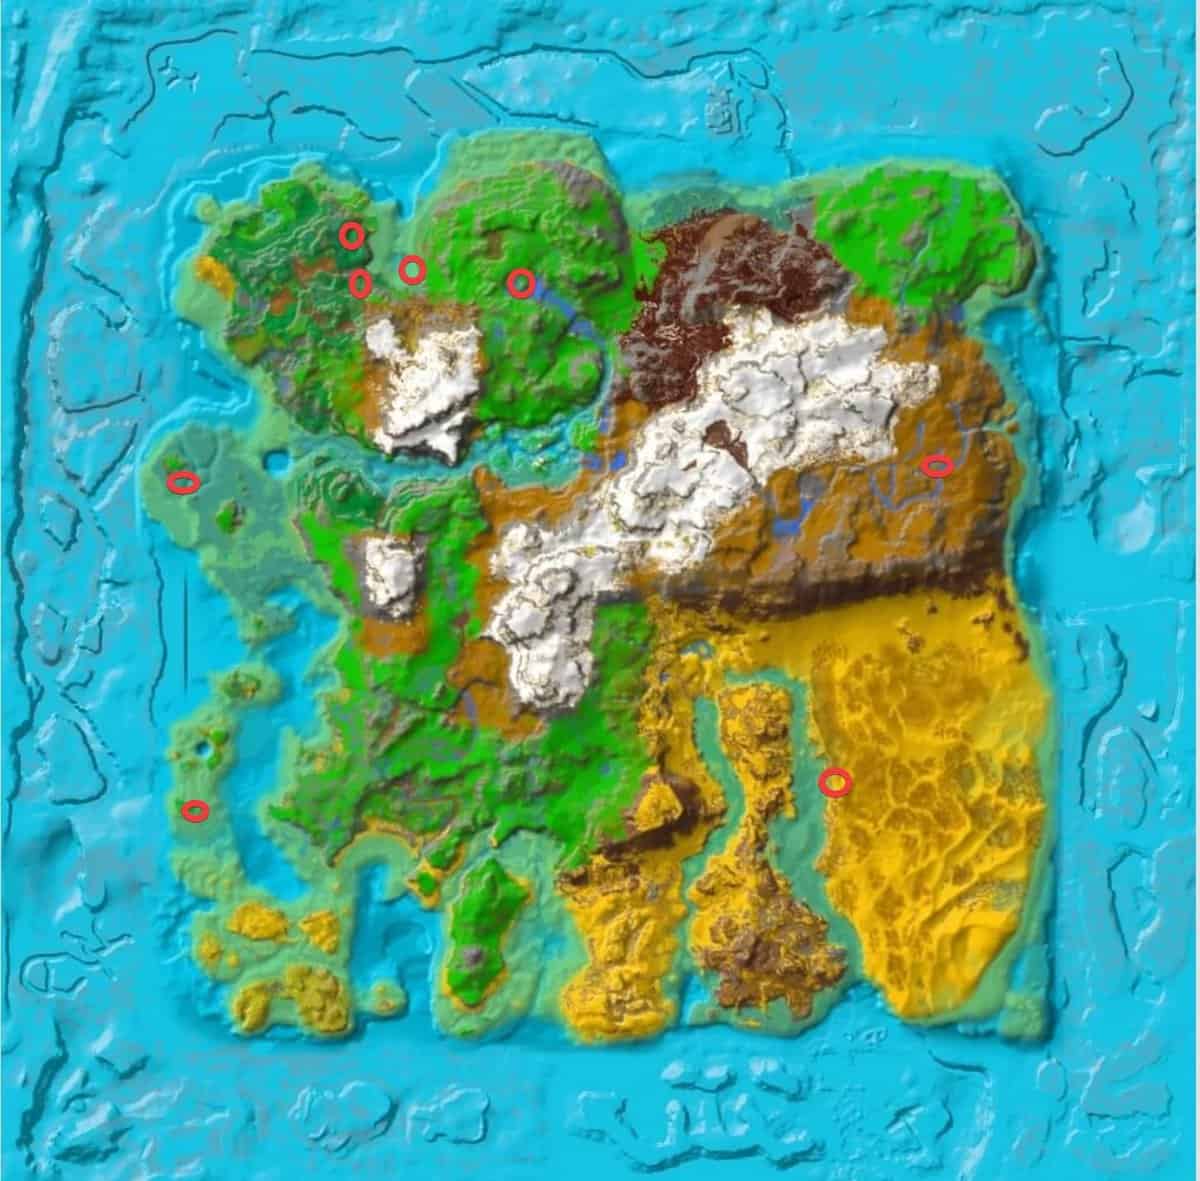
The Ultimate ARK Ragnarok Base Locations Guide categorizes settlements and strongholds into five functional types, each thriving in distinct environmental niches: - **Underground Bunkers**: Deep beneath volcanic plains or frozen wastelands, these hides escape from sky-borne aerial threats and heat spikes.Located near fissure vents (for geothermal power) but shielded from seismic crashes, bunkers allow uninterrupted production of high-tier tech. The guide identifies several such sites in the lava fields east of Mount Pyroval, where reinforced cave systems offer both concealment and access to molten mineral veins. - **Highland Fortresses** perched atop craggy plateaus dominate wide vistas, offering long-range visibility across Ragnarok’s collapsing terrain.
Elevated bases thwart stealth infiltration and enable drone surveillance. Notable examples appear near the Frostspire Peaks, where terrain elevation turns enemy approach routes predictable and manageable. - **Forest Camouflage Strongholds** blend into dense canopy zones, utilizing tree cover for near-invisible defense.
These bases excel in ambush operations, often stationed near ambush ambush ambush choke points—trackways flanked by thick undergrowth that funnel intruders into kill zones. The dense groves west of Lake Obsidian are a hotspot for expert base courses here. - **Dunesilent Bases** embedded in shifting sand regenerations capitalize on Ragnarok’s desert zones, relying on sand burrowing techniques to evade heat sensors and direct assaults.
Positioned within mile buffer zones of component-rich dune crests, these hideouts provide rare access to desert- região resources while minimizing exposure to rival scavengers. - **Coastal Salvage Camps** occupy shoreline straddles, combining marine harvesting with rapid supply transport. Strategically placed within tidal ranges, these bases enable swift Berry pickups, ship repair, and water-based supply chain reinforcement.
Key coastal sites abound near the serpent-encircled coves of the Avar Island, where tidal currents assist both defense and resupply logistics. Each base type integrates environmental advantages with targeted utility, and the guide’s maps layer elevation, resource density, and threat frequency to identify optimal deployment zones. “No one-size-fits-all approach works in Ragnarok’s Ragnarok chaos,” notes game veteran and base architect Elsie Tran.
“Understanding these nuances turns a scattered player into a territorial command presence.”
2. Zones of Opportunity: Top Base Locations Across Ragnarok’s Territories
The guide’s most actionable section maps Ragnarok’s six major biomes, pinpointing elite base locations that combine security, resources, and visibility. **Fire Zones – The Scorched Core** Fire zones roar with lava and ash, yet among the hottest real estate lies the safest nest.The underground bunkers beneath active fissures—especially along the Pyroval Rift—offer geothermal energy for advanced tech, while basements beneath cooled lava tubes provide natural shielding. “The heat is relentless, but so is the power,” explains guide author Finn Rek. “These basements harvest energy others ignore, giving their occupants a durable edge.” **Frostspine Highlands – Stalwart Sentries** Elevated plateaus near Mount Pyroval and Frostspire Peaks form natural defensive vantage points.
Bases carved into rocky outcrops here benefit from wind-swept visibility, allowing early warning against incoming raids. Moreover, these peaks bridge critical supply lines, making them hubs for tactical retreats and launch platforms. **Lava Fields – Infernnal Forges** Scarred by magma flows, lava zones demand ingenuity.
The guide flags fortified camps nestled near cooled basalt rafts, where basalt-carrying berries fuel crafting stations. Despite constant heat, these positions offer stealth advantages—hidden in shadowed crevices, they evade heat-seeking drones longer than open plains. **Shadow Woods – Camouflaged Redoubt** Thick canopy transitions into the Shadow Woods, a region where stealth defines survival.
Bases carved into hollowed trees or beneath overgrown ruins exploit natural camouflage, enabling silent ambushes and resource scavenging. Gameplay expert Jax Marlow advises: “In dense woods, a well-hidden base outlasts every open fort.” **Dune Regions – Desert Silence** Vast dunes conceal hidden treasure beneath shifting sands. Camouflaged bunkers camouflaged as terrain anomalies pierce the monotony, benefiting from isolation and exclusive access to rare desert flora.
“Desert bases thrive on patience and patience rewards,” insists guide cartographer Lina Cho. “Position wisely, move sparingly.” **Avar Coast – Maritime Crossroads** Shorelines offer dual advantages: trade and defense. Camps stationed within tidal zones harness marine Berries and enable rapid ship repair, while being shielded from direct land raids.
Lands meeting medium threat level within 2-mile buffer of high-value components are prime for coastal camps.
3. Tactical Placement: Layers of Defense and Business Planning
The guide doesn’t stop at location listing—it embeds strategic depth by layering defensive architecture with operational efficiency: - **Buffer Zones**: A recommended practice is establishing a 1.5-kilometer buffer between primary base and resource-rich extraction points, minimizing exposure during foraging.- **Resource Path Optimization**: Routes linking bases to resource nodes should avoid open plains; instead, favor rocky ridges or forested transitions that slow overexposed movement. - **Multi-Level Defense**: Advanced players layer defenses—forward scouting towers to detect threats early, mid-tier reinforced shelters for combat, and underground sanctuaries for last-resort evasion. - **Stealth Integration**: Even large bases benefit from camouflage integration; using natural cover, thermal dampening materials, and terrain mimicry reduces detection risk without sacrificing functionality.
Rone LeBlanc, a veteran strategist in Arc’s PvP circuits, sums up: “A base isn’t just a fort—it’s a logical extension of your playstyle. Place with awareness, strengthen with purpose.”
4. Real-World Applications: Mastering the Guide in Combat and Base Building
In core Ragnarok mechanics—heist raids, defensive standoffs, base expansions—the guide becomes an indispensable decision-making tool.Recognizing not just *where* but *why* a location excels transforms reactive play into calculated dominance. Whether ambushing aerial scouts through highground ambush corridors or staging supply drops from forest camouflaged outposts, mastery begins with understanding terrain-enabled tactics. Players who internalize the guide’s insights report sharper situational awareness and reduced vulnerability.
One veteran builder noted: “After using the guide, my team turned six assaults into controlled engagements—we weren’t just surviving; we were dominating.” 规劃 progressing builds, logistically planned expansions, and adaptive defense ensure long-term territorial control. From beginners mapping their first forest nest to experts leveraging coastal camps for deep-Ragnarok push, the guide serves as both textbook and tactical playbook.
Conclusion: Build, Hold, Conquer with Precision
The Ultimate ARK Ragnarok Base Locations Guide is far more than a map—it is the definitive roadmap to territorial mastery in Ragnarok’s chaotic landscapes.By analyzing heat, cover, resource flow, and threat density, it reveals precisely which corners of fire zones, frozen highlands, and shifting dunes offer the greatest advantage. Mastering these locations transforms base strategy from guesswork into precision. Every fire zone bunker, highland fortress, and desert camouflage position becomes a deliberate choice—shaping not only survival but dominance in one of Ark’s most unforgiving eras.
In Ragnarok’s hellish arena, where destruction reigns and victory hinges on timing and terrain, this guide ensures players do not merely occupy space—they command it.


Related Post

What the Rose Hartt Onlyfans Leak Reveals About Social Medias Unstoppable Breaking Boundaries

Levar Burton’s Surprising Discovery: A Father’s Journey When He Found Out He Had a Child at 3

How Old Is Paul Hollywood? The Age Behind the Charming Face of *West End Genius

The Transformative Journey of Cari Velardo: From Emerging Voice to Industry Catalyst